The Pursuit of Water (with tutorial)
 The process of doing digital collages like this without using Photoshop....
Some folks have asked me how I do this stuff -- so I set about to make a collage, keeping track of what I was doing. A couple people have assumed I use Photoshop, but I rely on more "primitive" programs. Apologies in advance for any undue nerdiness.
My tools are these:
1. An Argus DC1500 digital camera, bought for around $25-30. Decidedly no-frills.
2. Microsoft Photo Editor 3.0.2.3, which came bundled into my computer when I bought it.
3. Microsoft Paint 5.0, ditto.
4. Microsoft PowerPoint 2002.
I also use Adobe Acrobat 6.0 when I grab text from existing sources, e.g., for "Self-Portrait", "Cloud Mandala", and "Overtime".
I use Photo Editor to manipulate brightness, contrast, and gamma (which changes the contrast in the dark areas of the image); to rotate images in anything other than 90-degree increments; and to employ special effects (sharpen, smudge, emboss, set individual transparent colors, etc.). From there I copy pieces and insert them into Paint, where I do free-form trimming, masking, and assembling. I use PowerPoint mainly to reduce file size, but also to add my title at the bottom and for some special effects, e.g., the photo image-filled diamonds in "Tea Tin Quilt".
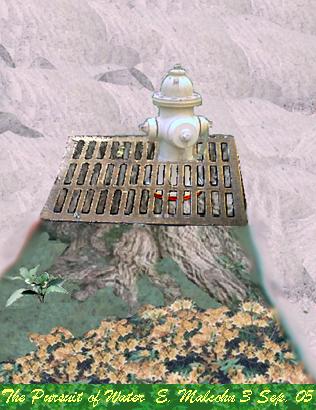
After a meeting at the library on Friday, I took photos of (among other things) a sewer grate, a fire hydrant, and sand on the road. The collection below shows the images I used in the piece. In the upper left is a sand picture as my camera saw it: darker and with less contrast before I altered it in Photo Editor.

I trimmed the rectangles of green from two photos, including the one of the hydrant. Other photos (taken with film) used in the collage are (a) the roots of a Japanese Cork Tree that I photographed at Boston's Arnold Arboretum; (b) flowers (I don't remember what kind), also photographed at the Arboretum; and (c) one of three Lilies of the Valley that Mary planted in about half a dozen square feet of soil outside our Dorchester apartment. (Our former landlord told us they're quite prolific now.)
I usually have no idea what I'm going to do when I start out. I flip through the images I have to see if I can find interesting juxtapositions and/or certain themes. This time I also concentrated on ways to show techniques that I use when I play around.
First I wanted to put the hydrant partially inside the grate, which required the following steps:
1. Isolate both objects: i.e., knock out the road surrounding the grate and the grass surrounding the hydrant. I also decided to get rid of the foliage encroaching on the grate.
2. Using masking techniques, insert the hydrant into the grate.
Isolating an object takes at least two steps. First I copied the picture into Paint. Then I used the regular and free-form select tools to trace and then delete pieces around the object. This left me with a loosely-trimmed, somewhat sloppy-looking image.
To neaten the trim I changed my view to 400% magnification so that I could see the individual pixels. Then, with as steady a hand as possible and working with small areas, I used the free-form tool to perform a closer trim.
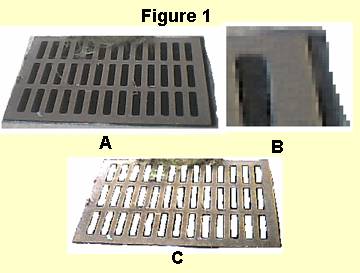
Figure 1A shows the loose trim of the grate. Figure 1B shows the upper right-hand corner at a 400% zoom (note the ragged right edge). Figure 1C has undergone two changes in two different programs. First I used Paint to do the fine trim under high magnification. Then I copied the image into Photo Editor and played with the balance (brightness, contrast, gamma) to lighten it and make it look more metallic. I then re-copied the new image back into Paint.
But there's still some foliage overhanging the grate. Again using the 400% zoom, I copied pixels from elsewhere in the grate and used them to cover the foliage colors.
If the spaces inside the latticework were solid black, I could have easily removed them in a single step using the transparency feature in Photo Editor. This feature lets one click on any color and make it transparent throughout the image. I tried using the feature, but ended up with transparent freckles due to the many colors that actually made up the "black".
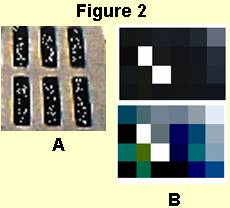
Figure 2A shows the freckles. The magnification in Figure 2B shows that the "black" is really a variety of shades. Taking the top set of blocks and altering its color balance in Photo Editor shows just how many different colors reside in a small snippet. Consequently, I used the free-form tool in Paint to trim away the black inside the latticework.
When I was done with the grate I trimmed the hydrant. I then needed to "insert" the hydrant into the grate, such that part covered the grate and part was covered by the grate.
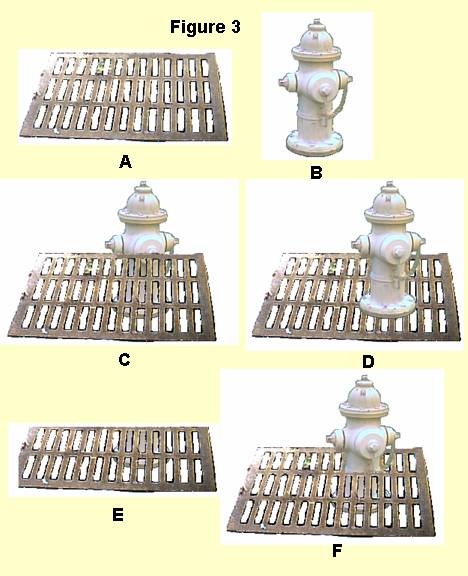
All the steps shown in Figure 3 were done in Paint. Figure 3A shows the trimmed grate with the foliage masked out; Figure 3B shows the trimmed hydrant. I superimposed the grate over the hydrant in Figure 3C, and then the hydrant over the grate in Figure 3D, using positional cues to have the hydrant in the same place in both superimpositions. The grate's latticework provided pretty straightforward cues.
I strongly recommend keeping copies of images in various stages of manipulation as the collage comes together. In Paint, once you superimpose one image on another and click, they are mated for life unless you click Undo. I often have several Paint screens open at once, filled with various pieces and their permutations.
In Figure 3E I pulled out the bottom part of the grate that covered the hydrant, set that over its counterpart in the image where the hydrant covered the grate, and voila! The hydrant is now inserted into the grate (Figure 3F). To position the pieces I used the regular "select" tool and set the picture to "transparent".
Then I had to figure out where to put the joined image. The collage elements indicated a water theme. I toyed for a while with some water images but couldn't make them work to my satisfaction. I'd been wanting to use the Japanese Cork Tree roots, so pulled that image into Paint and trimmed it.
The transcription work I do exposes me to all sorts of interesting tidbits. I think it was while I transcribed a Living on Earth segment that I learned you can hear a tree pull water up from the earth if you place a professional-quality stethoscope securely against smooth bark. A tree is like a gigantic straw. I tried it; sure enough. The roots would fit my water theme just fine -- though I suspect using the stethoscope on a Cork Tree wouldn't work due to the roughness of the bark.
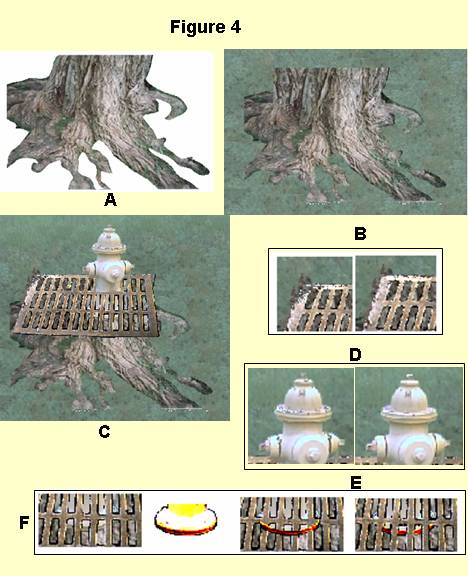 Except for a step in F, I used Paint to do everything in Figure 4. I combined the two rectangles of grass in various copies and rotations, using the free-form tool to "cut" the grass into unusual shapes so as not to get a seam in the image. I superimposed the tree trimmed in Figure 4A onto the grass in Figure 4B, then superimposed my hydrant and grate to get the image in Figure 4C. I wanted the roots to extend from the bottom of the grate and show through the entire latticework, so I copied some of the bark pixels and added them to the upper left of the tree image in 4B.
Using the "transparent" setting allowed the bark to show through the latticework, but this setting has drawbacks when you have pure white in your image that you want to keep. This problem appears in Figures 4D and 4E, and I handled each differently. The upper left corner of the grate in 4D looks ragged because the pure white in that image has dropped out. I copied small, slightly darker sections of the grate under high magnification and moved those sections over the gaps. Essentially this repeats the same steps I used to cover the grate's foliage coloration in Figure 1C.
The hydrant was more exacting due to its regularly-spaced bolts near the top. The left-hand image shows some "freckles" where some of the white has dropped out and the grass shows through. To solve that problem I switched Paint to "opaque" and very carefully used the free-form tool to trace an outline of the section of hydrant I wanted. I then placed that section over the "freckled" one.
I thought the bottom lip of the hydrant blended too much into the tree beneath the grate, so introduced more contrast, using the four steps shown in Figure 4F. First I copied the section I wanted to change and pasted it into Photo Editor. There, I again used the balance settings to turn the lip red. I re-copied the image and re-pasted it into Paint, where I used the free-form tool to extract only the red. First I placed the lip over its counterpart -- and, in this step, over the latticework. I then copied parts of the latticework from an older image of the grate and aligned them over the lip.
The bottoms of the foreground roots had their own freckles due to transparency, but that didn't pose a problem so much as the fact that the roots ended abruptly. I covered them with the flowers. As with other objects, I duplicated and rotated flower images to create a blanket over the root system. I could use Paint to rotate images in 90-degree increments but anything else required using Photo Editor.
I then turned to the three sand photos and combined them, copying, rotating, and using the free-form tool to retain dune waves while doing away with seams where different images met. I decided to continue the general line of the grate, which widened toward the foreground. Everything within those lines and beneath the grate would be a fertile image: grass, flowers, tree roots. Everything outside those lines would be sand.
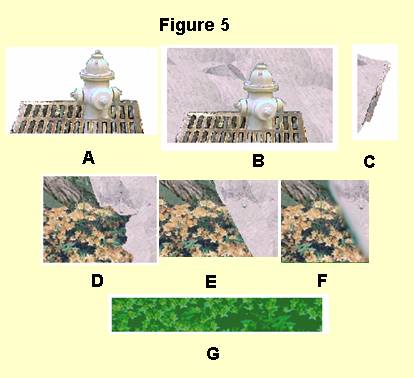 A duplicate, trimmed image of the hydrant (Figure 5A) replaced the one surrounded by grass, after I had covered the grass above the grate with sand (Figure 5B). The right-side edge of Figure 5C is a small, duplicated sliver of the grate, which I positioned directly over its counterpart in order to line up the sand.
Creating and following the extended line proved more challenging. First I trimmed away the grass in sections, then manipulated the sand image to fill in the gaps. Figure 5D shows flowers needing to be trimmed away; Figure 5E shows the sand in place. So as not to have too harsh a line I then moved the image into Photo Editor, where I smudged the grass-sand border (Figure 5F).
I still had a tree root that ended too abruptly, so used Mary's Lily of the Valley to cover it up. After superimposing one image, I rotated a copy of the lily in Photo Editor, darkened it, and reduced it in size. After re-copying to Paint I duplicated and positioned bits of grass around the stems.
To create the title I copied a section of the flowers into Photo Editor and changed them to green, fiddling with the balance settings (Figure 5G). I moved both that section and the collage into PowerPoint, in which I created the title text. Finally I adjusted the page size to fit the image and saved it all as a .jpg file.
Built as a bitmap file in Paint, "The Pursuit of Water" takes up 636K; when saved from PowerPoint as a .jpg file it reduces to 33K. PowerPoint converts to a smaller file than Paint, which would have produced a .jpg of 55K.
There will not be a test. But questions and ideas are welcome! Have a good (and safe) weekend, all.

This work is licensed under a Creative Commons Attribution-NonCommercial-ShareAlike 2.5 License.
posted by e_journeys at 5:00 PM
![]()


1 Comments:
I like the way it flows...regardless of the gate.
Post a Comment
<< Home